Using a pallet and some spray paint, you can make a stylish serving tray.. and it's EASY.
Subscribe to my channel:
Get the digital plans for this project:
/
HERE'S WHAT YOU'LL NEED:
- Wood glue
- Table Saw
- Miter Saw
- Dewalt DW735 planer
- 1 1/4" forstner bit
- Spray lacquer
- Spray paint (teal)
- 3M painters tape
- Hold down clamp (for jig)
- Stainless steel ruler 12"
MORE PROJECTS, POSTS AND EVENTS
Want to support ILTMS? Get early viewing, exclusive content and more...
BUY A SHIRT, STICKER, PENCILS and MORE!!
FOLLOW:
I grabbed a boards from my pallet slat stockpile.
I removed the cut off nails in the places where a saw might hit them, but left others when they were not in the way.
I marked the length of the tray bottom on my darker boards.
I cut all of the bottom boards to length, being careful to avoid nails.
I used a simple hold down jig to get a clean edge on one side of each piece.
This clean edge can be used against the fence to get a parallel cut edge. This jig is a create alternative to a joiner in some cases.
I cleaned up the opposite edges of the bottom pieces.
My side pieces were pretty straight, so I trimmed off the rough edge.
Then I ripped the side pieces down to 2" strips.
The end panels were cut to length on the miter saw.
I cleaned up the faces on these as well.
I glued up the bottom pieces as a panel, clamping from the top and bottom.
I ran the side and end pieces through the planer to smooth the faces. You could also just sand them with an orbital sander.
After it had dried, I put the cut edge of my glued panel against my sled and squared off the other edges .
I sanded down the top surface of the panel, just enough to loosen dirt and remove splinters, but not enough to remove coloring or character.
I set my side pieces against the panel and marked where to cut so that they were an exact fit.
These were cut to length on the miter saw.
I sat the side pieces in place and measured the full width for the end panels.
I marked the center line and measured out the width and height on the end panels. Then I added two nails at the same height as the side panels.
Using the nails, I bent a flexible ruler into an arc and traced the shape onto each piece.
I cut out this curve on the bandsaw, but a jigsaw would work as well.
These pieces were both squared off on the miter saw.
They were not exactly the same, so I clamped them and sanded then to match.
I marked circles in the center and 1 1/4" on each side.
Using a 1 1/4" forstner bit, I drilled out all three holes, which slightly overlapped.
I cleaned out the opening with a chisel.
I used a flexible sanding block to smooth out the inside of the handle.
The outside of the panel, and inside of the handle, were lined with blue painters tape.
I trimmed the tape off to be flush with the inside face of the panels.
I made sure to get this trimmed as closely as possible.
I sprayed a coat of spray lacquer over all of the pieces to seal up the edges of the tape. This will stop paint seepage.
Then I sprayed several thin coats of spray paint over the pieces, doing a light sanding after the first coat to smooth the raised grain.
When the tape was removed, the edges were very clean and sharp.
I sat the pieces around the bottom panel, and nailed them together with a brad nailer. I nailed the pieces to each other and to the bottom panel.
The whole piece was finished off with a few coats of spray lacquer. Second channel: bit.ly/iltms-2
Fpvracer.lt is not the owner of this text/video/image/photo content, the real source of content is Youtube.com and user declared in this page publication as Youtube.com user,
if you have any question about video removal, what was shared by open community, please contact Youtube.com directly or report bad/not working video links directly to video owner on Youtube.com. Removed video from Youtube.com will also be removed from here.

 #DriftMolėtai "Street" drift race finals 2022
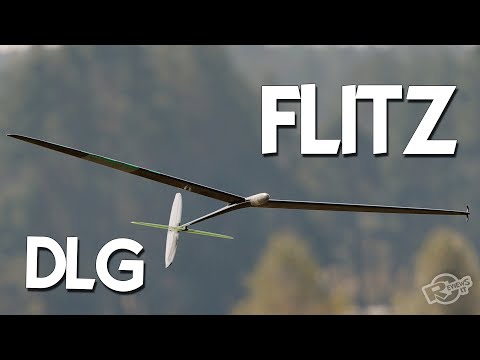 DLG - FLITZ - soaring joy!
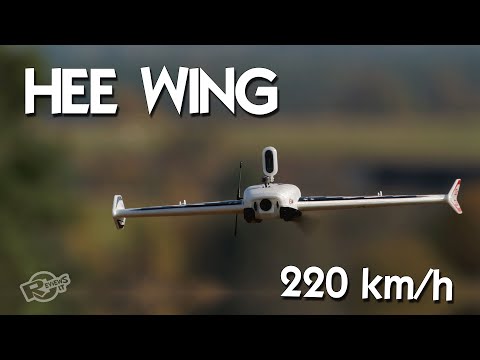 HEE Wing F-01 Ultra Delta Wing 690mm - upgraded Mini AR Wing? Diatone Reaper 690