Check out how I made a ring light for a GoPro with a Neopixel ring, a Pro Trinket and a 3d printed diffusion ring!
Subscribe to my channel:
BE SURE TO WATCH THE FOLLOW UP:
-----------
More info at
Holder/Diffuser .stl file on Thingiverse
123d Design
HERE'S WHAT YOU'LL NEED
- Pro Trinket
- NeoPixel ring (12)
- 100K potentiometer
- Plastic knob
- Battery pack power bank
- Ultimaker 2 Extended
- Transparent filament (2.85mm)
- GoPro Hero 3 (there are newer ones, but this is what I used)
- Soldering iron
- Wire strippers
- Thin solder
- Fiskars cutting mat
- Hook up wire
MORE PROJECTS, POSTS AND EVENTS
Want to support ILTMS? There are lots of ways .. find out more at
BUY A SHIRT, STICKER OR A HANDMADE ITEM!!
FOLLOW:
The NeoPixel ring (12) fits perfectly around the lens of the GoPro.
I'm driving it with an Arduino compatible Pro Trinket, from Adafruit.
I'm using a 100k potentiometer for changing the brightness.
The whole thing is powered with a cheap battery cell via USB.
I removed the long leads from the potentiometer with some nippers.
To prepare them, I pre-tinned all of the connections on the components.
Pre tinning the connects make it quick and easy to add the necessary connections.
I did added the wires to the potentiometer terminals too.
The Neopixel ring uses 5v, Ground and a Data Input for addressing the LEDs.
I connected the ring to the potentiometer at the GND and 5v.
Then these were connected to the Pro Trinket terminals for GND and 5v.
I connected the Neopixel "Data Input" wire to a digital pin on the Trinket.
The middle terminal of the potentiometer was attached to an analog pin on the Trinket.
I modified a simple example Adafruit sketch to dim the LEDs. It's linked above.
I plugged the Trinket to the power cell with a USB cable, and it lit right up!
Next, I had to figure out how to mount it on the GoPro.
Using some digital calipers, I measured all the parts of all of the components.
*Make sure you measure EVERY dimension, and be as precise as possible*
From those measurements, I modeled a holder in 123D Design. It's much easier to make than you might think. This was my first piece model in this app.
The finished model (.stl) was brought into my slicing software to prepare for 3d printing.
I printed the piece in transparent filament so it could also act as a diffusion ring for the LEDs.
I started inserting the components.
I made slots to allow the wires to feed through, so that the ring can fit as close to the camera body as possible.
I wired all of the pieces up, just like before.
I made two tabs to fit the holes in the Trinket.
The rest of the wires were trimmed, and soldered back in place.
The final piece was to add a knob to the potentiometer.
The ring fits around the lens with just enough tension to hold it in place.
It worked, and it's BRIGHT! Second channel: bit.ly/iltms-2
Fpvracer.lt is not the owner of this text/video/image/photo content, the real source of content is Youtube.com and user declared in this page publication as Youtube.com user,
if you have any question about video removal, what was shared by open community, please contact Youtube.com directly or report bad/not working video links directly to video owner on Youtube.com. Removed video from Youtube.com will also be removed from here.

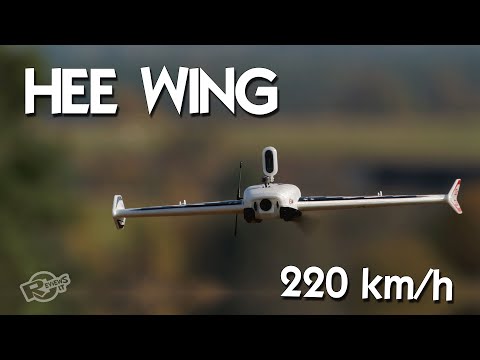 HEE Wing F-01 Ultra Delta Wing 690mm - upgraded Mini AR Wing? Diatone Reaper 690
 Auto moto parkas 2021-11-28 SandBOX
 Dirt bike and quadbike event at Crazy Ferma 2022-02-06