


After several years, the Futaba GY401 Gyro remains to be the bench mark gyro that all others are judged.
Ask 5 RC helicopter enthusiasts what the best Gyro is and 4 of them will likely say the GY401.
It is said that copying someone or something is the highest form of flattery; guess that is why there is a cheap GY-401
clone hitting the market almost every month it seems. Unfortunately while many try – none provide the performance or
piece of mind Futaba’s GY series of gyros offer.
The Futaba GY401 gyro is for the heli pilot who wants both flexibility in terms of what model heli the gryo works well
with and wants the assurance that a gyro malfunction or failure won’t bring down his/her dream machine.
The GY-401 works well in almost every single rotor bird out there from 400 size electrics up to 52cc gas or MW54 powered
turbine monsters with rotor diameters approaching 2 meters. In fact, Bergen RC recommends the the GY 401 in their
industrial Observer line of heavy lift gas and turbine RC helicopters.
The large range of heli size usage and outstanding performance is why the GY-401 outsells every other performance gyro on the market right now - It works in almost anything! In fact, when I asked my local (ok, 500 km away) hobby shop how many Futaba GY-401’s they sell – the numbers were remarkable. More 401’s than all the other gyros combined – pretty
impressive!
I know many people who started with a Futaba GY401 gyro in a small 400 size electric knowing one day they wanted to get
into a larger electric or nitro powered heli. The GY-401 follows the progress and that alone offers some nice value if
you don’t want to have to purchase another gyro for your next bird.
Description:
Type: Micro Heading Hold Gyro
Sensor: SSM AVCS
Weight: 27g
Dimensions (WxLxH): 27 x 27 x 20mm
Gain Setting: Remote Only
Mode Setting: Rate or Heading Hold – Remote Only
Operating Voltage: 4.8 VDC (Needs a voltage regulator (6 VDC) if using higher than 4.8v battery packs)
Reversing Switch: Yes, on gyro
Limit Trimmer: Yes, adjustment on gyro
Function: with reverse switch, DS mode switch, control delay adjustment knob, servo stroke volume adjustment knob. By transmitter to adjust gyro sensitivity and switching lock (AVCS) mode and normal mode.
Futaba GY401 Features:
AVCS (Angular Vector Control System) is Futaba’s patented heading hold gyro technology. AVCS works better than other HH
gyro systems at correctly compensating for and eliminating drifting issues in heading lock/hold mode caused by
temperature changes within the gyro.
The GY-401, just like all of Futaba’s AVCS gyros uses a SMM gyro sensor and is said to be better than other conventional
solid state yaw sensing technologies since all the electronic components are combined on a single chip improving
performance and reliability. SMM stands for Silicone Micro Machine.
Both Gain and Heading Lock/Rate modes are remotely adjustable through the gyro settings menu on a computerized radio. If
you don’t have a programmable computerized radio that you can program in different ATV values for the gain settings, the
Futaba GY401 will not work for you – there are no gain or mode selection options on the gyro case. A better choice for
non computerized radios or if you are lacking a spare channel for remote gain would be the Futaba GY240 or the E-flite
G90 (for smaller helis).
The Futaba GY401 has a built in Limit Trimmer adjustment so you can set the amount of tail rotor servo travel to avoid
servo over travel and stress on the servo. This is an easy way to set the travel over the more conventional method of
changing servo arm/tail rotor pitch arm lengths.
As mentioned, the GY401 supports both slower analog tail rotor servo pulse rates or can be switched to a 270 Hz high
frequency rate for fast tail rotor specific digital servos. Speaking of servos, the 401 comes in two different packages.
You can purchase the Futaba GY401 Gyro only package or the Gyro/Servo combo package.
How To Setup The Futaba GY401 Gyro?
The GY401 gyro by Futaba is perhaps the most popular RC helicopter gyro ever.
It’s simple to use, works with a wide variety of analog and digital servos and has a very attractive price point.
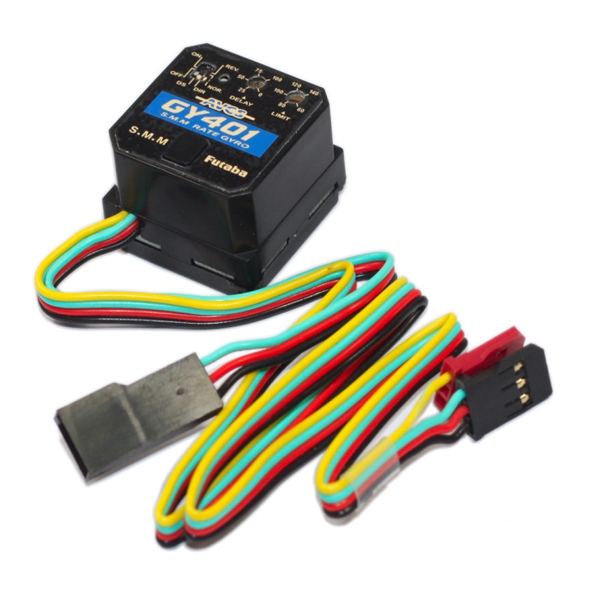
GY401
Pre-Setup Setup
Plug the gyro’s main lead (black with 3 wires – black, red, green) into the rudder channel on your receiver. This is channel 4 on most receivers, but consult your radio’s manual if you’re not sure.
Then plug the other lead (red servo plug – yellow wire) into the gain channel in your receiver. This is normally channel 5, but can be also be set to any aux channel. Again, if you’re not sure, check your manual.
Since there is only one wire on this channel, you need to make sure you plug it in correctly. The yellow wire should line up with the other lighter colored wires in the receiver. Depending on the servos and other electronics you’re using, these could be white, orange or yellow.
And finally, plug the other servo lead (black female lead) into your rudder servo,
GY401
Warning: If you have DS (digital servo) mode enabled and you’re using an analog servo, there’s a good change you’re going to burn out the servo motor. If you’ve got analog mode selected for a digital servo, you’ll want to get it switched around, but it’s not likely to cause any immediate problems. Check the switch on the gyro and make sure it matches the tail servo you’ll be using.
You’ll also need to mount your gyro to your helicopter using the foam mounting pads that come with it in a place where it will be secure and stay relatively safe in a crash.
Radio Setup
Step 1 – Set ATV’s, Reset Trims, Disable Mixing
Set the endpoints or ATV’s on your rudder channel (usually channel 4) to 100% each way. This number doesn’t affect the actual servo throw, but piro rate which I’ll explain later on.
Make sure all trims and subtrims are set to 0. There is no need to veer use trim on the rudder channel. If your tail is drifting, you’ll need to check your gyro gain or mechanical setup.
Also, make sure that there is no revo or any other mixing on your rudder channel.
Step 2 – Check Rudder / Gyro Direction
Check that your rudder and gyro channels don’t need reversing.
When you spool up and input right rudder, the nose of your heli should move to the right and the tail to the left and vice versa. If the nose moves to the left when you input right rudder input, reverse the rudder channel (usually channel 4) in your radio.
To check that the gyro is working in the right direction, push the rudder stick to the right and note the way the tail servo moves. Then take the tail of the heli and yaw it left. If the rudder moves the same way both times, then your gyro direction is set correctly. If it moves in opposite directions, then you need to reverse the gyro using the switch on.
Notice:
This is high imitation Futaba GY401 Head Locked Gyro.
Package Includes:
1 x Futaba GY401 Head Locked Gyro